Hi Everyone,
What’s Cooking is a series in which I answer questions you may have about food or cooking but are too shy to ask.
Last week, in part 1 of cooking with other flours I discussed how gluten-free flours are different from wheat flour (mainly regular all-purpose flour). This week, I’ll share with you my experiences in working with coconut, breadfruit, sweet potato and cassava flours.
 As I explained last week, using gluten-free flours is not simply a matter of replacing wheat flour with a 1:1 ratio. The structural make-up of the ingredients, enzymes, and molecules are different. The production process to convert coconuts, cassava, sweet potatoes and breadfruit, to flour, necessitates the dehydration of these ingredients. With the absence of the protein – gluten – these flours when mixed with liquid to form dough(s) and batters perform different from regular flour.
My approach to testing and using alternate and substitute ingredients is always to work with them to make things I would use in an everyday manner. Therefore, my tests and experiments with these gluten free flours extended only to breads, rolls, bakes (float bakes) and Sada roti-style flat breads.
Flours
- Breadfruit
- Cassava
- Coconut
- Sweet potato
Breads
In each case I attempted to make a pound-loaf of bread. In other words, my aim was to make a loaf of bread with the dry flours weighing a pound. Instead of measuring by volume, say by cups, I opted to measure by weight. As you know, baking is a science so getting the right measurement is important, particularly when testing and experimenting.
When I measured by weight, I found the volume of the gluten free flours to be more than what would have been needed if I was using all wheat flour because they (the gluten free flours) were lighter. The one with the most volume was the coconut flour. For example, when weighed, the volume of 4 ounces of coconut flour is more than 4 ounces of wheat flour.
My first experiment was to replace half of the wheat flour in the bread recipe with half of the gluten free flour; that means I used 8 ounces of all-purpose flour and 8 ounces of coconut/cassava/breadfruit/sweet potato flour. In each case I had to use more water to bring the dough together to a stage where I could work (knead) it to develop gluten to give the bread structure. I also added extra fat that varied in forms; sometimes it was vegetable oil, butter or vegetable shortening. This was needed to improve the texture of the bread when baked. In each case I also added a little more yeast – a pinch or two and found that I had to leave the dough to proof for a longer period of time, about half an hour. The extra time was needed for the yeast to ferment with the flour in order to produce the carbon dioxide gas that facilitates the puffing up of the dough.
The dough would rise but never to the volume it would with an all all-purpose flour dough. It makes sense though given that I was working with half a portion of gluten free flour.
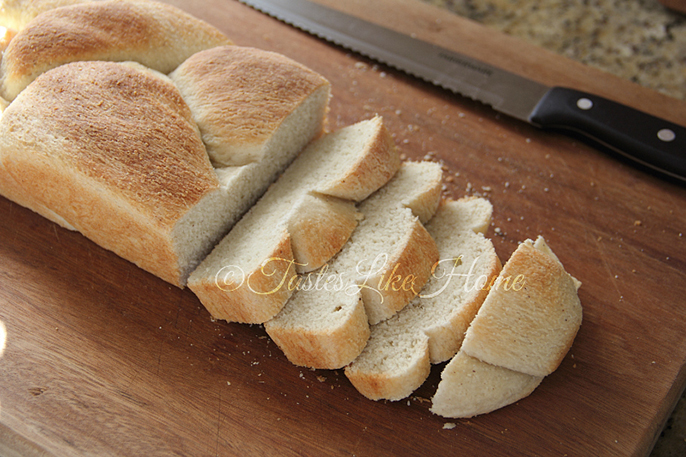
While the cooking temperature remained the same, the cooking times varied between 5 – 8 minutes more than if baking an all wheat flour bread. Once cooked, the breads did not always look as attractively brown as regular bread. The coconut bread had a grainy appearance. The cooling time was longer too. When cut, the breads had a dense crumb but they were not dry, I attribute that to the fat put into the dough. The flavours of the breadfruit and sweet potato bread were easily discernable. The bread with the cassava flour was slightly meatier to the chew; I guess that’s because of the high starch content in cassava.
The coconut bread was really tasty the following day when toasted and buttered. In each case, I found that the breads were best the same day they were made. Taste testers confirmed that the following day, they preferred the breads toasted.
Over the months of experimenting with various volumes and measurements, all in an effort to suit my taste and come up with a texture that was pleasing to my palette, I finally settled on a weight measurement that yielded loaves that I was confident that I would make more than once. I do not have celiac disease (gluten intolerance) so my use of these gluten free flours is just for variety and the experience of working with them. I weighed ¾ of a pound of white all-purpose flour and ¼ of a pound of gluten free flour (this comes up to 1 ¼ to a 1 ½ cups depending on the flour itself as well as the brand). About 2 – 3 ounces more of all-purpose flour is added during the prolonged kneading process to get the dough smooth.
Rolls & roti
I used the same 12 ounces flour and 4 ounces gluten free flours to make dough for bread rolls and Sada roti and the flat breads. The flat breads are the same Sada roti dough kneaded softer and rolled thin.
I experimented making paratha (oil) roti and even dhal puri with the above measurements; they were unsuccessful. The texture and tastes were off. I find the combination best suited to Sada roti or thin flat breads.
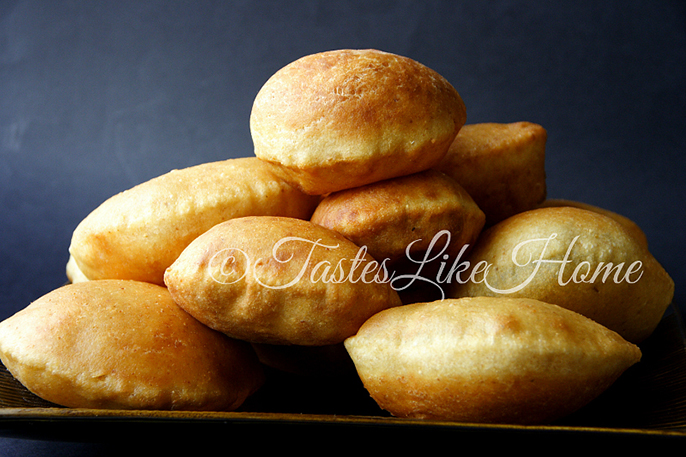
Bakes (floats)
Using half and half measurements by weight works but using this combination results in the bakes absorbing more oil when cooking. Remember I explained at the top of the column that the structures of these flours are different, and some of them need a longer time to cook, hence needing to stay longer in the oil.
Honestly, I would not make fry bakes with these flours, I would prefer to grate fresh cassava or coconut and add it to the flour to knead and make the dough for the fry bakes. In the case of the sweet potatoes and breadfruit, I’d boil and mash the flesh, let it cool completely and then add it with the dry wheat flour to make a dough for the bakes.
Fresh alternative
The use of boiled, mashed and cooled flesh of sweet potatoes and breadfruit along with all-purpose flour produces excellent bread. However, in these cases, I measured by volume. I used my sense of touch/feel to determine how much of the mashed flesh to add based on how the dough felt as I worked with it. For 1 large loaf, I measured 3½ cups all-purpose flour and added to it 1½ cups of boiled, mashed sweet potatoes or breadfruit. Be sure the mash is smooth and completely cool before adding to the flour to make the dough.
With these fresh alternatives, there’s no need to add more liquid (you may actually use less) and no need for extra butter, oil or shortening other than what the original recipe calls for. Determine when it is done cooking based on the cues given in the original recipe you are using.
Finally Disclaimer
The use of the NAMILCO product below has been of my own volition. I have not been asked, paid, or offered free samples of the product to test or review.
A few months ago I picked up a couple packets of National Milling Company of Guyana Inc (NAMILCO)’s Multigrain Flour in Barbados at one of the larger supermarkets to test it. The flour comprises 8 grains – corn, barley, sesame, millet, rye, flax seeds, oats and wheat flour. The flour makes excellent and tender chotah (Guyanese-style pancakes, sometimes called sweet roti). Unlike the gluten free flours, you can use half of this flour and half all-purpose flour to make tender Sada roti, flat breads, and regular sandwich loaf. Measure by weight not volume.
Bread with Coconut Flour
Yield 1 loaf
INGREDIENTS
- 12 ounces all-purpose flour (2¼ cups) plus extra for work surface
- 4 ounces coconut flour (1½ cups)
- 1 teaspoon instant yeast
- 1 teaspoon fine table salt
- 2 tablespoons sugar
- 1 ounce unsalted butter (2 tablespoons)
- Lukewarm water
DIRECTIONS
- Mix together flours, yeast, salt and sugar.
- Rub butter into flour mixture.
- Add water to bring together the ingredients to form a dough. Transfer to a
well-floured work surface and knead for 10 – 12 minutes. Put dough in an
oiled large bowl, cover, and place somewhere warm to proof for 1½ hours or
until doubled in size.
- Brush loaf pan (9 x 5) with oil and set aside.
- Punch down dough to deflate and let out gas, knead for 2 minutes, shape and
place in oiled pan. Let rise for 1 hour covered, in a warm place.
- Twenty minutes before the hour is up, preheat oven to 375 degrees F.
- Bake for 25 – 30 minutes or until pan sounds hollow when tapped at the
bottom.
- Remove from oven and let stand for 7 minutes, then free bread from the pan
and place on a wire rack to cool to room temperature before cutting.
Cynthia
Cynthia@tasteslikehome.org
www.tasteslikehome.org