Hi Everyone, the pièce de résistance at Christmas is the ham – a very large cut of meat, cured, cooked and glazed to glistening perfection. Studded with cloves and sitting on a platter, it takes its rightful place at the centre of the dining table for all to drool over and admire. For many, there would be no Christmas without ham. Even people who profess to not eat pork all year, make an exception at the holidays and eat ham. Such is the lure of this other white meat.
In an effort to get to your ham nirvana, let’s look at the four stages involved – shopping, prepping, cooking and serving the ham.
Shopping
 The ham that we either produce ourselves or import is wet cured and fully cooked. Wet cured means that the ham was cured in brine and depending on the brand or manufacturer, the ham is also smoked. The ham comes with a net casing that would have been used to hang and or submerge the ham as it cured. It is then sold vacuumed sealed in plastic and frozen. The cuts we can buy are leg or shoulder, also known as picnic ham.
Ham really refers to the back legs of the pig, and there are only 2 hams on every pig. The ‘other ham’ is really the pork shoulder that has been cut and prepared in very much the same way as the leg-hams. The tissue and muscular make up of these cuts are different. As a result of this, the cooking time for leg and shoulder ham is different. It is the same principle applied when choosing and cooking a pork roast. The legs take less time to cook because the meat is leaner with a thinner fat cap and meatier. The back legs are not worked as vigorously as the front legs (shoulders). Based on these facts you can see why the legs are prized as hams. Leg hams are much larger than shoulder hams.
When you go shopping for your ham, be sure to read the label to determine which cut you are buying. The leg ham is always more expensive than the shoulder ham, for obvious reasons.
A final note on shopping for hams – brined hams contain moisture (from the brining process) and some of that moisture will shed during the cooking process thereby shrinking the ham. Therefore, consider this as you determine the size of the ham you buy and the number of persons you plan to feed.
Prepping
Defrosting
In order to cook the ham we have to prepare it and we do that by first defrosting the ham. Never plunge your frozen ham into a large container or bowl of water to defrost. If you do, you are simply adding unnecessary moisture to the ham and in the process you are likely to dilute some of the ham flavour as the water interacts with the meat. Defrost the ham slowly and naturally by leaving it intact in its package and placing it either at the bottom of your refrigerator for 48 hours or leaving it in your sink or on your countertop, covered in a large bowl, overnight (if you are baking it in the morning) or early in the morning if you are baking it in the evening.
Once defrosted, remove all the packaging materials from the ham and pat it dry with paper towels. Remove the rind (the skin) and reserve it for use to flavour your Cook-up Rice, Pelau, Rice and Peas or soups. Next, take a knife and remove some of the excess fat but not all of it. You want some of the fat to remain on the ham so that the ham bastes itself as it cooks and keeps moist. Leave about ¼-inch of fat around the ham or on top of the ham if it is a shoulder ham.
Just like the skin, you can reserve the fat removed and render it to create a flavourful oil that can be used to sauté vegetables, aromatics, or toss with potatoes for roasting.
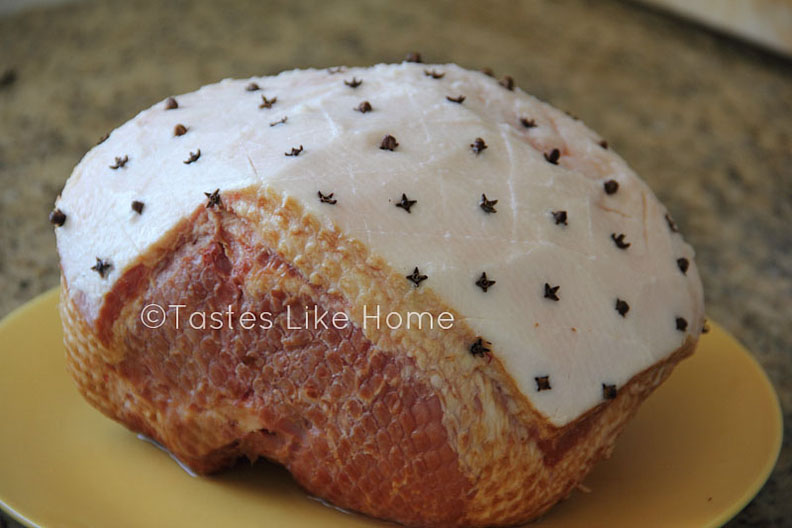
Scoring & Studding
The reason for scoring the ham is 2-fold and not necessarily in this order – for decorative purposes and to also assist in the ham being evenly heated through from the top. The scoring also makes it easier for the fat to melt and baste the meat as it cooks.
Using a sharp knife make diagonal cuts along the fat of the ham being careful not to cut into the meat itself. Your cuts are going to crisscross and create diamond shapes along the surface of the ham. Stud the ham with whole cloves by placing a clove in the centre of each diamond cut. The use of cloves dates back for centuries; they have preservative/curing properties and the flavour complements the cured meat well. At this stage, your ham is ready for the oven but if you like, rub the ham with mustard. The use of mustard is again for flavour and like the cloves, mustard also has preservative properties.
Cooking
Oven temperature & timing
The packaging on most hams, particularly store-bought, will indicate information such as oven temperatures for cooking and cooking times per pound or kilogramme. Work with the instructions given, especially if you are new to the process. I do things a little differently so use my suggestions only as a guide. The key thing to remember when “baking” a ham is that you are essentially heating up the ham because it is already fully cooked. Please remember that this advice is given based on the hams we produce and import here in the Caribbean.
- For bone-in shoulder hams – cook at 350 degrees F for 25 minutes per pound (if I want to slow cook the ham I go at 300 degrees for 30 minutes per pound)
- For boneless shoulder hams – cook at 325 degrees for 20 minutes per pound
- For bone-in leg ham – cook at 325 degrees 20 – 22 minutes per pound
- For boneless leg ham – cook at 325 degrees for 18 – 20 minutes per pound
The internal temperature of ham when fully baked/heated should be 140 degrees F. Test the temperature by inserting a thermometer but do not let the thermometer touch the bone. Stick the thermometer probe into the thickest part of the ham. If it reads 135 degrees F, you can remove the ham from the oven as the carry-over cooking will raise the temperature to 140 degrees F.
- Preheat your oven for at least 20 minutes before adding the ham to cook.
- If your ham is not fully defrosted, it will take longer to cook. Bring the meat up to room temperature to ensure even and thorough cooking/heating.
- For easy clean up line the bottom of the baking pan with aluminium foil.
- Use a pan with a baking rack inserted, this way the ham does not sit in a pool of moisture and with the rack, the heat will circulate evenly all around the ham.
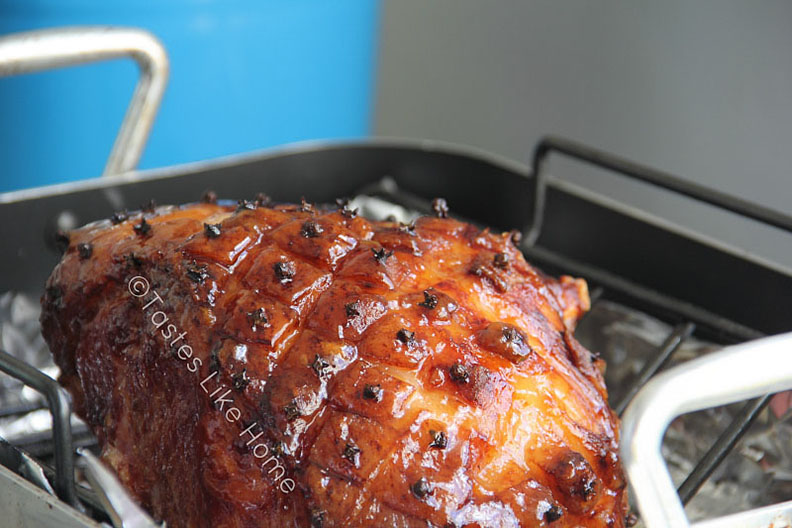
Glazing
Glazing works 2 ways on a ham – to add an additional layer of flavour and to make the ham look even more attractive.
Start glazing the ham during the last half an hour of cooking. Glazing is about caramelization, and if added too early, the high sugar content in a glaze can result in the ham browning and burning before it is properly heated through. Not to mention the smoke filled oven that can result as the glazes drips to the bottom of the pan and burns.
Add the glaze in 2 installments – half an hour before the ham is done cooking and 15 minutes before it is done cooking. The glaze is not to simply sit on the top of the ham but it should be baked into the outer coating of the ham, therefore, it is necessary after each glazing to let the ham continue to cook so that the glaze can be bonded to the ham.
Making Glaze
The easiest glaze to make comes out of a jar of jam. Pineapple is the favourite and most traditional with which to make ham glaze, but this year, stretch yourself a little, try guava, sorrel, plum, orange marmalade, strawberry, raspberry, ginger, peach, apricot or cherry. To spice things up a little, mix it some achar! Ooh la la! If you want a little more spice, add some ground cinnamon or ground allspice or mix in some spicy mustard and a lil West Indian pepper sauce. In some cases you can use a combination of jams. Make that glaze your own propriety blend!
To make the glaze, simply combine the jam with some tap water, place over low heat and whisk until the mixture has heated through changed to a thick pouring consistency. It should not be watery and it should not be so thick that it turns back to jam when cooled. Make extra glaze if you would like to serve some on the side with the ham.
Use the following as a guide:
¾ cup jam with 2 – 3 tablespoons water (this will vary depending on the density of your jam)
Serving
When the ham is done cooking, do not, I repeat do not cut into it right away. I know that the aroma of the ham while baking would have tortured you for a few hours but you can wait a little longer. Let the ham rest for at least 20 minutes before cutting in to it. This is so that the meat can relax and the juices redistribute throughout the meat so that each slice is moist and meaty.
Cynthia