Hi Everyone, There is increased demand for bread during the holidays and not just any bread but good quality homemade bread. We need bread for so many things. There is Pepperpot to be sopped up, Garlic Pork sandwiches to devour and Ham sandwiches to customize. There is Sunday morning toast to accompany bacon and eggs, and there is the simple pleasure of having a warm slice of bread smeared with butter, melting into the bread.
 The holidays are when we want the best of everything so we splurge and go the extra mile. Home cooking is at its best around these times; even those who do not cook all year round make the effort and step into the kitchen. Hard as this is to believe, good quality bread is not always easy to find and during this period of high demand, waiting at the last minute to get fresh bread from a bakery can be disappointing – sold out! You will never have to worry about that if you’re willing to make your own bread, and this is where this column comes in. I am going to offer you three options from which to choose how you want to make your own bread. My recommendation is that you make your choice based on your level of comfort in handling dough and what you desire from a loaf of bread.
Here are the choices.
If you are intimidated about kneading, then the no-knead version is perfect for you. I am not just saying this. A couple of years ago, as a test to see how easy this bread is to make, I asked 2 friends, both of whom never baked bread before to try making the no-knead bread. Both had excellent results and said that the process inspired confidence in their ability to bake. I shared their exploits with you in a column back then. Feel inspired? Read on.
The no-knead bread will result in a rustic, artisan-style of bread. It will yield a large loaf with a good crust and meaty texture.

The second version of bread, which I like to call my no-proof bread, can be baked immediately after kneading. I tend to give it a 10-minute relaxation after kneading but that is purely a personal preference. During that time, I would wash my hands, clean up the work surface etc. However, the bread can be baked immediately. Unlike the no-knead bread, this version does require a certain amount of kneading so that the gluten structure can develop well enough to facilitate the immediate baking.
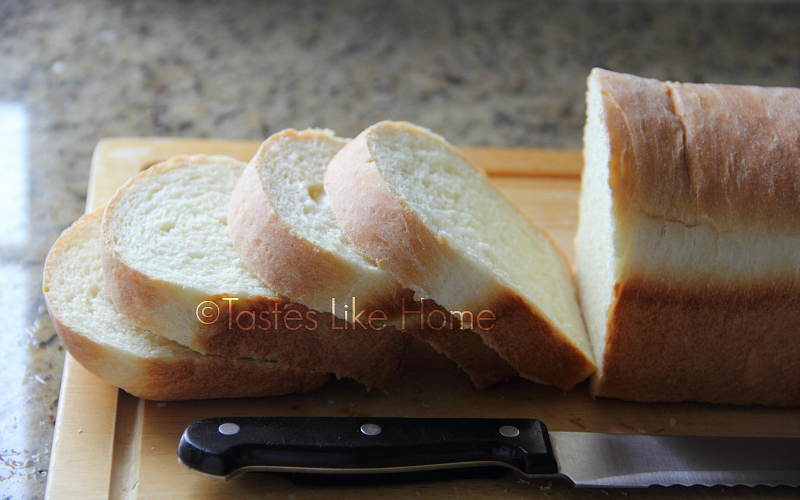
This version of bread will be compact with a tight crumb and make for easy slicing.
The main difference with this bread when it comes to baking is that the bread has to be cooked in an enclosed environment in the oven. What that means is that the bread has to be baked in an ovenproof pot with a lid or an ovenproof dish with a lid. Not to worry though, if you have a Pyrex dish or any other ovenproof dish, they can work with aluminum foil as the cover. See? There is a work around.
The final bread is simply, regular bread or bread as we know it – with the kneading of dough and the traditional 2-rise method. This is homemade bread but with a better overall structure and superior flavour. It’s the kind of homemade bread we grew up on.
Let’s make some bread and get the house smelling as inviting as a bakery.
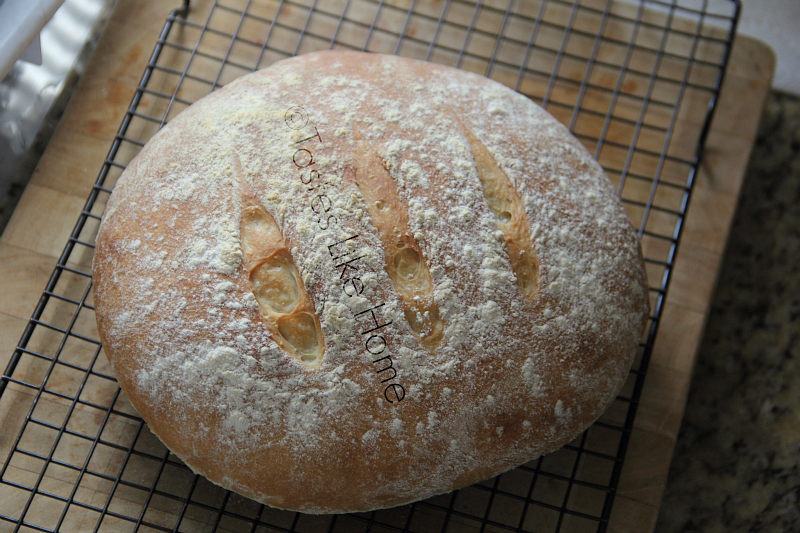
Artisan No-Knead Bread
Yield: 1 large loaf
INGREDIENTS
3 ¼ cups all-purpose flour, plus extra for dusting
½ tablespoon salt
1 tablespoon sugar (brown or white)
1 tablespoon instant yeast
1 ½ to 1 ¾ cups warm water (110 – 115
degrees F)
Cornmeal for dusting
DIRECTIONS
- Add the flour, salt, sugar and yeast to a large bowl and mix thoroughly.
- Pour in 1 ½ cups water and stir to mix and form a wet dough. If you find that there is still some flour in the bowl that has not been incorporated into the mass, then add the ¼ cup of water; mix together for 30 seconds. The dough will be wet and pasty.
- Cover the bowl with plastic wrap and leave in a warm place to proof/rise for 2 hours or until doubled in volume.
- While the dough is rising, line a baking sheet (18” x 13”) with parchment paper and dust the parchment-lined baking sheet with cornmeal and set aside.
- Generously dust a work surface with all-purpose flour.
- Tilt the dough out of the bowl onto the floured work surface (use a rubber spatula or wooden spoon to help you get all the dough out of the bowl). Don’t worry, the dough will be very sticky and it will spread.
- Flour your hands well and lift the dough from one side to the middle, on to itself; now do the same with the other half of the dough (flour your hands again if necessary). Now flip the dough over, seam-side down.
- Lift the entire dough (or leave it on the work surface) and using your hands, tuck it in to form a large ball. Do not be afraid to dust your hands with more flour.
- Once the ball has been formed, transfer it to the lined, dusted pan. Leave uncovered in a warm place to rise for 40 minutes.
- After the first 20 minutes, preheat the oven to 450 degrees F with the rack in the middle.
- At the 40-minute mark, transfer the risen dough to the oven and bake for 20 – 25 minutes. Check after 20 minutes and if the bread looks brown and the crust is solid and very firm when tapped, remove the pan with the bread from the oven and transfer the bread to a wire/cooling rack and let cool completely to room temperature before cutting.
NOTES
Use a large round pizza pan if you have. You can also use 2 regular loaf pans but in order to do so, you will need to cut the dough in half at stage # 7 and oil the pans well before adding the dough.
Sprinkle with flour and make 3 sharp cuts with a serrated knife for design just before adding bread to the oven (optional).
You might find that during the baking of the bread there is the smell of something being burnt, don’t worry; it is just the cornmeal getting dark.
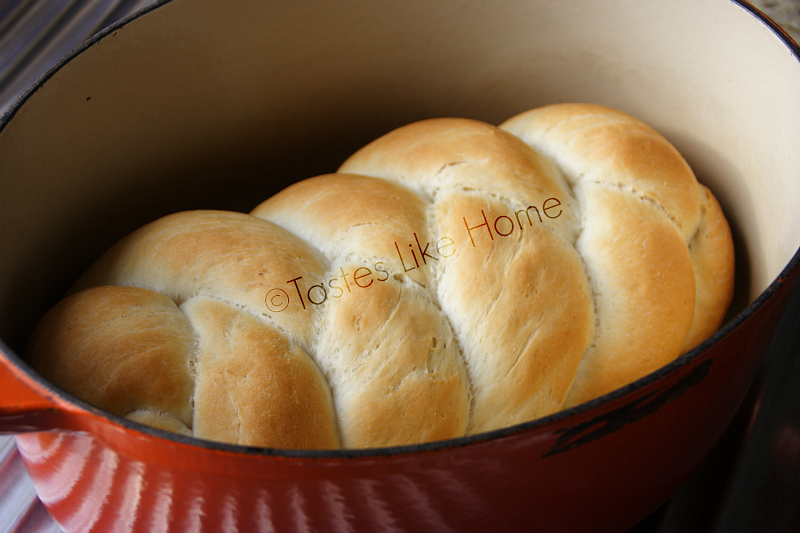
No-Proof Instant Bread
Yield: 1 large loaf
SPECIAL EQUIPMENT
1 x 6-quart ovenproof pot with lid or bowl/dish of similar capacity. If there is no lid, use aluminum foil to cover the dish/bowl.
INGREDIENTS
- 3 ½ cups all-purpose flour, plus extra for work surface
- 3 teaspoons instant yeast
- 3 tablespoons brown/white sugar
- ½ teaspoon fine table salt
- 2 tablespoons vegetable oil
- 1 cup – 1 ¼ cups warm water (110 – 115 degrees F) you may need more or less depending on your location and quality of flour
DIRECTIONS
- Mix together the flour, yeast, sugar and salt, make a well in the centre.
- Pour oil and water into the flour and mix to form a dough. Turn dough on to lightly floured work surface and knead for 12 minutes until smooth.
- Shape dough however you like.
- Lightly brush the pot/dish/bowl with oil and transfer the dough. Cover with lid or foil and place in the oven. Let rest for 10 – 20 minutes (optional).
- Turn on the oven to heat to 400 degrees F. Bake covered for 40 minutes then remove the lid/cover/foil and bake for 5 minutes or until the bread is nicely browned. Remove from the oven and rest for 8 – 10 minutes before removing bread from baking vessel. Cool on a wire rack to room temperature before cutting into bread.
NOTE
- Baking time begins once you add the pot to the cold oven and immediately turn on the heat. There is no need to preheat the oven.
Regular White Loaf
Yield: 2 loaves
SPECIAL EQUIPMENT
2 (9” x 5”) loaf pans, oiled
INGREDIENTS
- 2 pounds all-purpose flour
- 2¼ teaspoons instant yeast
- 4 tablespoons brown/white sugar
- 2 teaspoons salt
- 3 tablespoons oil or melted butter
- 2½ – 3 cups warm water (110 – 115 degrees F)
DIRECTIONS
- Mix together flour, yeast, sugar and salt. Make a well in the centre of the flour.
- Add oil/butter and 2½ cups water to make a dough, if it is dry add the remaining water a quarter cup at a time. Turn the dough on to a floured work surface and knead for 6 – 8 minutes then transfer to a large oiled bowl. Rub the dough with oil, cover and put somewhere warm but draft free to proof for 2 hours or until more than doubled in size.
- Punch down dough, knead for 2 minutes, divide equally, shape into balls and let rest uncovered for 10 minutes. Braid or shape dough as you like and transfer to oiled loaf pans. Cover and put in somewhere warm to rise for 45 minutes or until the dough crests the rim of the pan.
- 20 minutes before the 45 minutes is up, preheat the oven to 375 degrees F.
- Transfer pans to oven and bake for 30 – 35 minutes or until bread is nicely brown and sounds hollow when tapped.
- Rest in pan for 7 – 10 minutes then remove the loaves and cool on a wire rack to room temperature before cutting/slicing.
NOTE
- Use baking sheets if that is all you have or shape the dough into rolls and use round baking pans to bake them.
Inbox me
(cynthia@tasteslikehome.org) if you have any questions.
Cynthia