 Hi Everyone,
My friend Patricia on the telephone: “Do you want me to slice the bread or leave it whole?” Silence. I was thinking. Before I could respond, Pat continued, “I know some people prefer their Coconut Bread to remain whole so that they can break off pieces instead of having it sliced.” “Sliced,” I said. We were going on a tour around the island with colleagues so sliced was the best option for sharing.
About 20 minutes after we had settled in and the bus drove off, I leaned over to enquire from Pat if the Coconut (sweet) Bread was in the bag on her lap or in the one overhead. It was in the bag overhead. Retrieving the bag, I rested it on my lap sliding the zipper open. I could feel the warmth of the tinned loaf on my lap. I parted the bag and the sweet smell of spice, essence, and the indescribable aroma that fills the air as you pass by a bakery slowly rose and spread like smoke wafting through the air. Heads turned, someone whispered over our shoulders, “Is that bread?” They did not need to define ‘bread’ we knew they meant Coconut Bread. Before I knew it, I’d shared the entire pan of sliced Coconut Bread and there was none left for me. Everyone eating the bread was praising its taste.
Pat tilted her head to one side and looked at me. I stared at the empty pan, a light coating of crust bordering the insides where the bread lay as it baked. I ached on the inside. I so had my mind set on a slice of the bread ever since the night before. Then I heard a conspiratorial whisper: “Well it’s a good thing I have another loaf in this bag”. Pat was referring to the bag on her lap. I laughed, hugged, and thanked her.
This was the first time I would be tasting Pat’s Coconut Bread. She made hers the old-fashioned way – without raisins or cherries, with coconut in the middle, and with the dough kneaded. All of this means that the bread was dense, solid, with a very tight crumb. Generally speaking, before tasting Pat’s Coconut Bread, I’ve never been a fan of this version. The closest thing to it that I really enjoy is the Coconut Bread made by a family friend here in Barbados. Her bread, too, is dense; however, she puts raisins in her bread and mixes all of the coconut into the bread, making for distribution throughout the bread; which I prefer.
I grew up eating the best (for me) Coconut Buns and Coconut Bread, made by my mother. And though that is a standard to which I hold Coconut Buns and Coconut Bread, I am open to other people’s versions, because there is no one way to make or cook anything. Taste, as I have said time and again, is subjective. I enjoyed Pat’s bread very much – warm and at room temperature, it was equally tasty though different from the Coconut Bread that I make (based on my mom’s recipe). I asked Pat to share her recipe with me, and here are the things I noted as I made and ate the bread.
● The bread calls for a lot more flour in order for the mixture to be kneaded as one
would with a traditional yeasted dough. The finished dough should be stiff, firm.
● Because of the kneading and the resulting development of gluten (from the flour),
the baked bread boasts a very tight crumb. When the bread is cut cold out of a
refrigerator, there is sturdy sawing motion needed to slice the bread.
● The recipe calls for only 1 egg so I believe that the egg in combination with the
bands of gluten resulting from the kneading binds the bread together, making it
solid, compact, and heavy when cooked.
● Nutmeg was the spice of choice.
● The sweetened coconut mixture in the middle of the loaf was a welcome treat, in
the same way that raisins and cherries are in a bread.
● The sprinkled sugar crust was a yummy touch.
● Pat’s recipe called for less sugar than my recipe but that did not detract from the
taste of the bread because there was the sugar-sweetened coconut in the middle
as well as the sugar crust on top of the bread.
I stuck to the recipe with only 3 departures. Firstly, in addition to the nutmeg, I also added ground cinnamon. Secondly, I used butter instead of margarine. Thirdly, I did not add the amount of extra flour that would have been needed to make the dough stiff. Here’s why: As instructed, I floured the work surface and started to knead the dough but as it came together, the sugar started to melt as a result of the friction caused by kneading. The butter also melted making the dough moist. The addition of more flour, for me, would have been taking away
something from the Sweet Bread – making it doughier and the coconut getting lost. Therefore, after incorporating about three-quarter cup of flour (separate from the original amount in the mixture itself), I stopped kneading.
The result was a dense, firm bread, but not dry. It’s a different Coconut Bread. I liked it and will definitely make it again. It was not as nice as the one Pat made though and I think I know why. Pat, like myself and so many other people, cooks by instinct, so she knows much more of this or that to add to give it the feel, texture and taste. This is the first time she had actually sat down to consider the weight and quantity of ingredients for the bread. I gave her one of the loaves I made, and I am nervous about the feedback.
Do give Pat’s Coconut Bread recipe a try and let me know what you think. Do not compare it to your own. It is a different version of Coconut Bread.
I’m going to have a thick slice right now accompanied by sharp cheddar cheese and a cup of tea.
Cynthia
Pat’s Coconut (Sweet) Bread
Yield: 2 loaves (8 x 4 or 8 ½ x 4 ½)
INGREDIENTS
For filling:
● 6 tablespoons fresh grated coconut
● 2 tablespoons sugar
● ½ teaspoon essence (almond, mixed or vanilla)
For loaves:
● 1 pound all-purpose flour (3 ½ cups), plus extra for worksurface and kneading
● 3 teaspoons baking powder
● 4 ounces (1/2 cup) margarine, room temperature (I used unsalted butter)
● 2 heaped cups fresh grated coconut
● 6 ounces sugar (3/4 cup), plus extra for sprinkling
● 1 teaspoon fresh grated nutmeg (I also added ½ teaspoon ground cinnamon)
● 1 whole egg, room temperature
● 1 teaspoon essence (mixed or vanilla)
● ¾ cup evaporated milk (I used whole milk)
DIRECTIONS
1. Preheat oven to 350 degrees F with the rack in the middle.
2. Grease loaf pans and set aside.
3. Mix together the ingredients for the filling and set aside.
4. Add flour, baking powder and mix together in a large bowl.
5. Rub butter into the flour until it looks like coarse crumbs
6. Add coconut, sugar and nutmeg to the flour mixture and toss to mix.
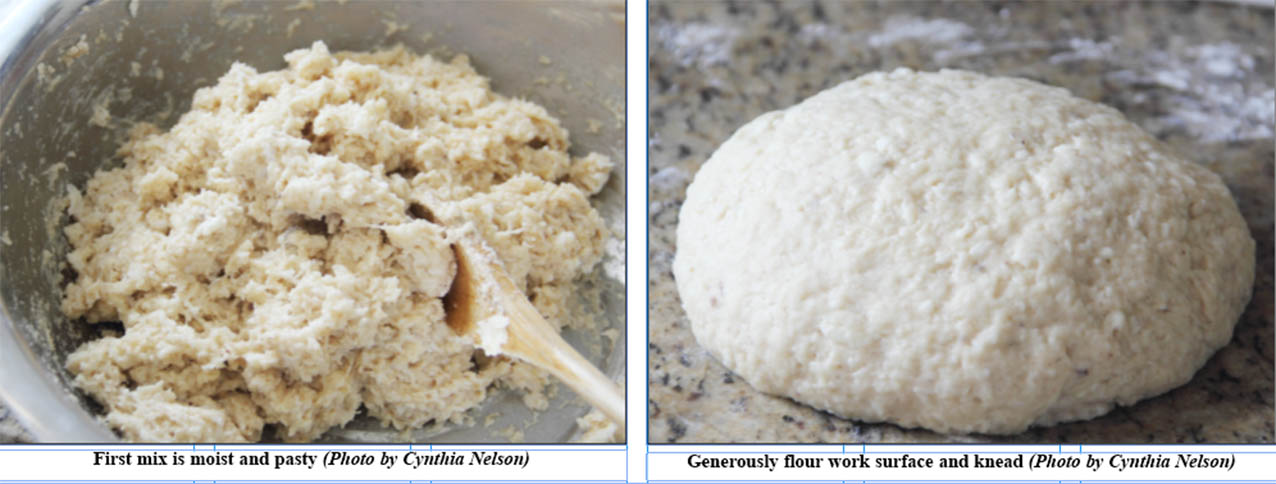
7. Beat egg with essence and add to the coconut-flour mixture along with the milk
and bring together. The mixture will be sticky-pasty.
8. Generously flour a work surface and transfer the mixture to the surface; generously
sprinkle the mixture with flour and knead mixture until it can be shaped into a ball.
Add a little flour at a time until the dough is firm (please see my notes below).
9. Divide dough in half. Using your hand, turning it in a cutting motion, make an
indentation along the middle of the loaf, like a little canal. Add half of the filling
mixture and then bring the dough together to seal the filling. Use the motion of
closing a book and pinch the mixture to seal. Transfer to a loaf pan, seam side
down. Repeat with the other piece of dough.
10. Sprinkle the top with sugar.
11. Transfer to the oven and cook for 45 – 50 minutes or until brown and solid to the
touch.
12. Rest in pan for 7 minutes then transfer to wire racks to cool. Serve warm or at
room temperature.
NOTES
● The filling can be eliminated.
● Raisins can be added to the mixture; if using, add them in at direction # 6.
● You can opt to knead the mixture just enough to incorporate the flour from the
work surface and what you have sprinkled on top.
● The mixture can be added directly to the pan without being kneaded, however, the
crumb will not be as dense.