Hi Everyone,
I love it when second, third or fourth generation Guyanese living abroad write and ask me questions about dishes and various foods that they heard of a long time ago, or that their parents or grandparents use to make. Such requests often provide me with the opportunity to learn something, not just academically but also practically, because invariably, I’d have to come up with a recipe to share with them so they too can create a taste of home. This is exactly what happened last year when a second-generation Guyanese man living in Canada wrote to ask about the pot bakes his mom used to make.

My mom was visiting with me during that time and so I turned to her for information. “It is a sada roti cooked in a hot covered pot on low heat. My mother used to make it stuffed with salt fish and onions and we used to eat it sometimes for breakfast or dinner,” she said. Umm, a stuffed roti, how irresistible! I sent my sada roti recipe to the gentleman in Canada with the instructions of how to cook it from my mother. He wrote back expressing joy at being able to make pot bakes. Ah, another taste of home satisfied.
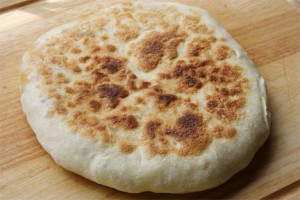
A sada roti, for the uninitiated, is a type of Indo-Caribbean flat bread. It is thick and is cooked on a flat iron griddle. When cooked and hot, the outside is crusty and the inside meaty. There’s nothing like a fire-side-cooked sada roti where the edges are toasted by the flames licking at it. The technique is replicated in a modern kitchen on a gas stove where the iron griddle is pulled off to the side of the burner revealing the flames; the roti is turned often to cook the edges.
Given that many of you, like me, find yourself often asking – what to cook today? And always looking for ideas, I thought I’d share my pot bake experience with you in the hope that you’d be inspired to try making it too. These pot bakes that you’ll make however, are not going to be the plain ones, you’re going stuff them like I did. You can opt to use the fillings I used or come up with your own. Be sure to let me know what other fillings you come up with so that I can try them too.
There are three main things you need to consider before setting out to make the pot bakes.
The pot – ideally, you want a heavy bottomed pot with a secure lid (a lid that fits perfectly and airtight over the pot). This is necessary for two reasons. First the pot being thick and heavy-bottomed will ensure that burning does not take place and that the heat is properly maintained throughout the pot. The secure lid provides the oven-like environment to “bake” the dough.
The heat – too high and it will brown the dough too quickly without the insides cooking or worse yet, burn the pot-bake. The pot, like an oven will need to be preheated before adding the dough. The pot will be heated on medium heat and then reduced to low and be maintained at the low temperature throughout the cooking process. This low heat will cook the dough and completely heat the filling all the while creating a nicely browned outer crust.

The filling – if you are going to experiment, you want to ensure that you have a filling that will not expand as it cooks nor will it ooze and cause the dough to turn damp or moist, particularly when it is resting. If this happens, it will make rolling the dough difficult.
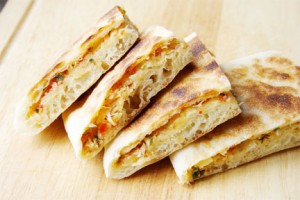
As long as you understand the three elements (pot, heat and filling) outlined above, the rest is easy. All you need is the dough and the filling. To give the dough that bread-like texture when cooked, I used baking powder and yeast. For fillings I used sautéed (fried) salt fish and seasoned mashed potatoes (just as you would for a potato ball or choka). The stuffing should always be at room temperature and not hot when being filled in the dough.
I am confident that once you try making pot bakes, you’ll fall in love with them as will your family and friends.
Pot Bakes
Yield: 6
Ingredients
4 cups all purpose flour, plus extra for work surface
4 teaspoons baking powder
1 teaspoon active dry yeast
1 teaspoon granulated white sugar
1 teaspoon salt
1 tablespoon oil
1 ½ cups warm water
2 ½ cups stuffing of your choice
Equipment
1 large bowl, oiled
1 damp kitchen towel
1 large baking sheet/tray, lightly dusted with flour
1 rolling pin
1 large heavy-bottomed pot with cover (think cast iron)
1 flat spatula
1 basket or bowl, lined with paper towel or a kitchen towel
Method
1. Add flour, baking powder, yeast, sugar and salt to bowl and mix until fully incorporated. Make a well in the centre.
2. Add oil to water; pour into the well of the flour and mix to form a soft dough. Once the dough is formed, knead for 1 – 2 minutes and transfer to an oiled bowl, cover with damp towel and let rest for 30 minutes.
3. Divide stuffing into 6 equal portions and set aside.
4. Knead rested dough gently and divide into 6 equal pieces.
5. Form each piece of dough into a ball, flatten and roll into a 5-inch round. Place the stuffing on the dough spreading it out; leave ½-inch free from the edges. Now carefully lift the ends of the dough pinching to seal as you go along (just as you would with a dhal puri only in this case, you don’t want the dough and stuffing to end up in a round ball. You want it to be a round flat disk). Transfer to baking sheet and cover with damp kitchen towel. Repeat until all the dough has been stuffed and shaped.
6. Heat the pot on medium heat (without the cover). To test if the post is heated accurately, dip your fingers in water and sprinkle it in the pot, if there is a loud sizzle and the water dries out almost immediately, the pot is too hot but if you sizzles moderately and the water takes 2 – 4 seconds to dry out then it is perfect, reduce the heat to low.
7. Lightly flour the work surface and roll your dough into a 6-inch circle. Dust off all excess flour on both sides! Add the dough to the pot and cover the pot. Let cook for 5 minutes; at the end of that time, flip the bake over, re-cover the pot and cook for another 5 minutes. When you open the pot at this stage you will notice how puffed up the pot-bake is. Remove with your spatula and place in basket or bowl. Repeat the process until all the pot bakes are made.
8. Serve hot or warm.
Note
Depending on the type of pot you have and the size of the burner you are using, you may have to regulate the heat and the cooking may be different from that specified in the recipe.


