Hi Everyone,
Disclaimer – I have not been solicited in any way to write about this product. For 2 years now I have been buying and using the National Milling Company of Guyana (NAMILCO)’s Multigrain Flour sold in supermarkets here in Barbados. The views and opinions expressed are my own based on my personal experience using the product.
 Bread is not a staple in my home. However, I love baking all types of bread, and do so often because I find the act therapeutic and rewarding. My friends benefit from most, if not all, of my bread making. The only time I eat bread is when I get some urge, out of the blue, and that is not often. And when I do eat bread, I unapologetically prefer white bread.
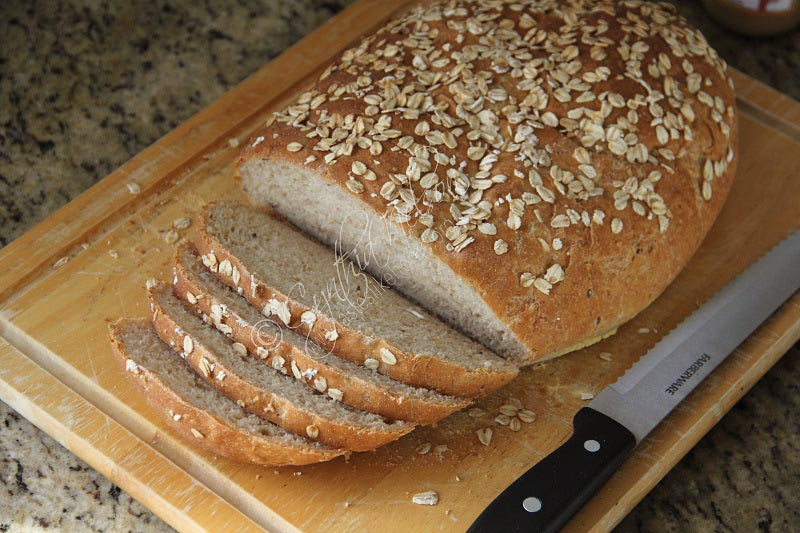
I have been using NAMICLO’s Multigrain flour now for a little more than two years. I’ve made American-style pancakes, Guyanese chootah, sada roti, flatbreads and pizza dough with the flour. I’ve mostly used it in combination with all-purpose flour and the results have yielded an attractive tenderness to the finished product that I attribute to the grain combo that makes up the flour – rolled oats, barley, flax seeds, corn grits, rye, sesame seeds, millet and wheat flour. I had been wanting to make bread with the multigrain flour for a long time but for some reason I always put off the idea, figuring that I would have to do what is generally required with non-wheat flour – test and work out a combination/ratio with wheat flour and the addition of a few other ingredients to provide a pleasing texture and taste when cooked.
Last week I felt like experimenting. There are varying degrees to my experiments. Sometimes I have a good feeling and idea about a dish and it is more about testing; on other occasions the experiment would entail me making it up as I go along, and then there are those times when I am blindly doing things to see what comes of my free-spirited actions. That was the case with this bread.
Using my go-to no-knead bread recipe, I measured 3 cups of the NAMILCO multigrain flour and just for the heck of it, I added half a cup of all-purpose flour; yeast, salt, a little sugar, oil and water rounded out the ingredients list.
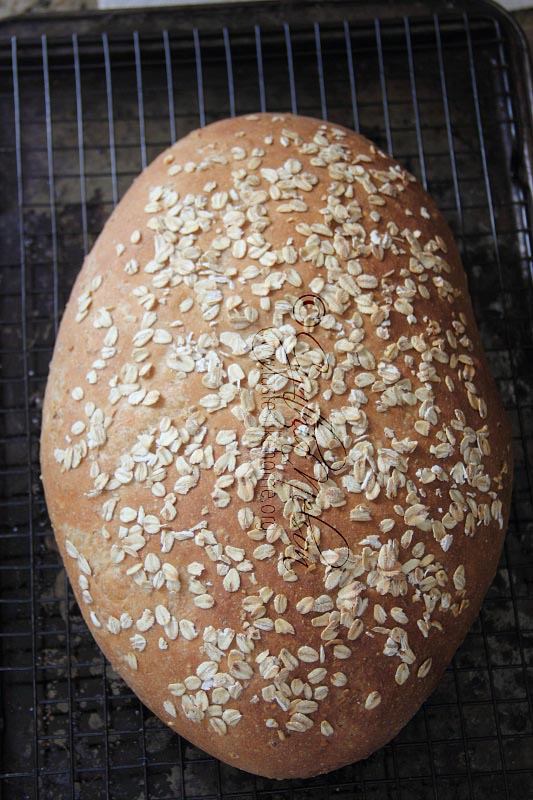
Two hours later, after proofing, the dough was gently kneaded, shaped and left to rise. The dough gave a majestic oven spring resulting in a nice large loaf. The crumb was tender and not dry – as I’ve said before, an attribution I make to the particular make up of NAMILCO’s multigrain flour. The following day the bread still remained tender. Later in the day, I wrapped the bread tightly and refrigerated it. When I retrieved the bread from the refrigerator to toast, it still tasted great, it was not dry, and when toasted, it tasted even better. I enjoyed the bread so much that as soon as it was finished, I made another one. Yes, me.
What I like about this multigrain bread is that everything is already IN the flour. I don’t have to take all-purpose flour or bread flour and then add a long list of grains and specialty ingredients to make it into a multigrain dough mixture to make bread. Making multigrain bread could not be easier with NAMILCO’s multigrain flour. If you like bread, if you eat bread regularly as part of your diet and you are looking for a healthy version, try this bread. I think you’ll like it. Let me know what you think when you make it.
Cynthia
cynthia@tasteslikehome.org
www.tasteslikehome.org
Multigrain bread
Yield: 1 large loaf
INGREDIENTS
. 3 cups NAMILCO multigrain flour
. ½ cup all-purpose flour, plus extra for work surface
. ¾ tablespoon instant yeast
. 1½ teaspoons fine table salt
. 1 teaspoon sugar
. 1½ cups warm water (110 – 115 degrees F)
. 2 tablespoons vegetable oil
. 2 – 3 tablespoons cornmeal
. Rolled oats for topping (optional)
DIRECTIONS
Mix together the flours, yeast, salt and sugar in a large bowl.
Add water and oil to flour mixture and stir to mix with a wooden spoon for about 30 seconds – the dough will be wet and sticky. Cover and put some place warm but draft free and let proof for 2 hours, until more than doubled in size.
Line a 9 x 13 or 13 x 18 baking sheet with parchment paper. Dust with cornmeal and set aside.
Generously flour a work surface and your hands.
Tip the dough out of the bowl, scraping to get out all of it. Sprinkle the dough with flour and knead gently for 1 – 2 minutes. Shape into a round or oblong. Transfer the dough to the prepared baking sheet. Leave uncovered to rise for 40 minutes.
Halfway through the second rise (after 20 minutes), fit a rack in the middle of the oven and preheat oven to 425 degrees F. At the end of the 40 minutes, brush the dough with room temperature water and sprinkle with oats, if using. Transfer to the oven and bake for 25 – 30 minutes or until brown and the bottom sounds hollow when tapped. Remove from oven and transfer to a wire rack to cool to room temperature before cutting.
NOTES
If you want to make this bread the traditional way – a drier dough, kneaded, then add only just enough water to the flour mixture to form a dough. Knead for 8 – 10 minutes before covering and proofing (rub bowl with oil when set to proof).
Whole milk can be used in place of water to make the dough.
Sesame seeds, pumpkin seeds, poppy seeds, and flax seeds can all be used to top the bread, either as a mixture or as a single seed topping.