 For many people, there is no Christmas without ham. For me personally, it is all about the Pepperpot and homemade bread. The ham is front and centre whether at breakfast, brunch, lunch or dinner and all the little sandwich-snacking over the holidays. I’ve received quite a few emails and direct messages about how to bake ham and since it’s still early enough to purchase a ham, here are some tips and advice on to go about preparing it for the holiday meal.
Types of Ham
Most of the ham we get today in the Caribbean is wet cured (soaked in brine) and already fully cooked. When it comes to the cut of the ham, we usually get leg ham or shoulder cut ham, sometimes labelled as picnic ham.
Leg ham comes from the back legs of the pig and shoulder ham comes from the front legs of the pig. The leg hams are meatier, have less fat and take less time to cook. This is so because the legs do not do much work, or they are not muscularly strained as much as the shoulders are. What this means of course is that the shoulder cut ham has a higher fat content, more connective tissues and takes longer to cook.
When we talk about cooking the ham, what we really mean is heating the ham through because, like I said, the ham we get in the Caribbean is already fully cooked.
Defrosting
It is absolutely important that the ham is completely defrosted so that it will result in even cooking and thorough heating.
The best way to defrost the ham is to let it sit at a particular temperature until it is defrosted. Do not submerge the ham in water. Doing so will result in the ham absorbing more liquid and that is not something that you want. Remember all you are doing is re-heating thoroughly and you want to keep the flavour of the ham not dilute it.
The safest but slowest way to defrost the ham is to let it sit in a pan, bowl or large plate at the bottom of your refrigerator. Depending on the size of your ham, this can take anywhere from 24 to 48 hours.
Our warm Caribbean temperatures can lead to bacteria developing if we defrost outside of the refrigerator, but I have found a safe way to do so that always works for me. I defrost late in the evening and in a covered, secure environment that helps stabilize the temperature. I use a very large container with a cover or an insulated cooler. The temperature at this time of the year is cooler in the evenings and having an airtight, controlled and stable defrosting environment, saves me precious hours when it comes to defrosting my ham.
Defrost the ham in the packaging it came in. This prevents anything external from attacking it. Once defrosted, remove the vacuumed plastic casing and the net casing. Be sure to read and note the cooking instructions on your package before discarding! Pat the ham dry.
Prepping the ham – The Rind and Scoring
Remove the skin or rind from the ham. Do not discard it. Save it to put in your Cook-up Rice, Rice and Peas or soups. Wrap it in a zip bag and place it in the freezer until you are ready to use it.
Take a sharp knife and remove some of the excess fat but you want to leave at least a ¼-inch layer of fat, this is important because it is going to help baste the meat naturally as it melts, and it will also aid in caramelization.
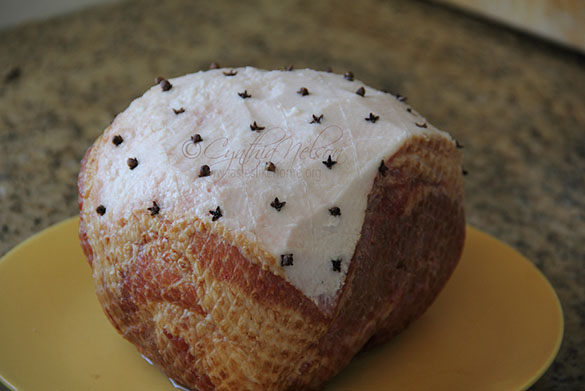
The next step is to score the fat – make long slanting cuts in one direction and repeat, cutting in the opposite direction to make perfect little diamond shapes. Be careful not to cut so deep that you cut the meat itself. All you want to do is cut/score the layer of fat on top. Do you have to do this? No, it’s just traditional and it looks pretty but please, don’t score it if you don’t want to.
Stud the ham with cloves – you can either do like I do and place the clove in the centre of each diamond-shaped cut (from scoring the ham) or place the cloves at the corners of each of the diamond cut.
A good friend of mine told me, that as a kid, her favourite part of the ham being cooked was when her Mum scored the ham and she would put in the cloves. She liked the way it looked. She liked the idea of it being all even. It was a little thing, but it helped her feel that she was contributing to preparing this grand cooking project – the Christmas meal.
Baking
Preheat your oven to 325 degrees F. The rack could be on the second tier of the oven (from the bottom) but remove the other racks so that there is enough room for the ham when placed in the oven. Let the oven preheat for at least 20 minutes.
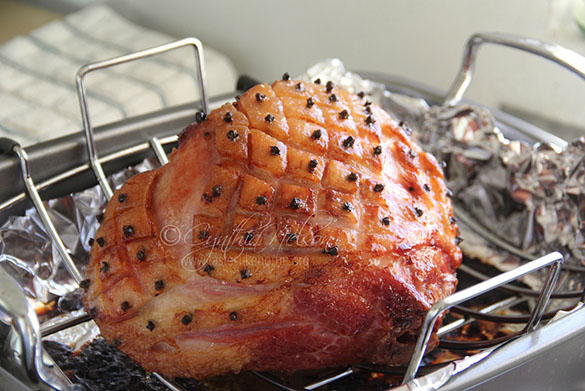
Use a roasting pan with a rack, and line the pan itself with foil. Trust me, this will help tremendously with clean up. I even put a double layer of foil and let it come up to the sides of the pan. Then, insert the rack.
Transfer the ham to the rack and let it cook as per the instructions on the package. Cooking times will vary depending on the cut of ham you are baking and the actual size of the ham. The package instructions will tell you what internal degree of temperature the ham should reach when it is done. For a fully cooked ham, it is usually 140 degrees F as measured with a meat thermometer.
The Glaze
Glazing a ham is really to give it a nice glossy finish and add a little sweetness. You can choose whatever fruit preserve or jam flavour is your favourite. Most people tend to go with pineapple. I like pineapple too but these days I do all sorts of things like guava-glaze, marmalade and achar glaze, and most recently a sorrel chutney glaze.
Making the glaze is simple; just put about ½ cup of the jam or preserve into a little saucepot and ¼ cup water and heat gently over low heat, stirring until the jam and water have melded. Add a teaspoon or two of mustard as you like for an extra kick.
Now I am sure that you have seen many photographs with hams perfectly decorated with pineapple slices and cherries. You can certainly do this too if you like. You will need canned pineapple slices and maraschino cherries.
You should only start glazing the ham 1 hour before it is due to be finished. Brush it with the glaze and then repeat every 20 minutes until it is time to remove the ham from the oven.
If you plan to decorate the ham with pineapple slices and cherries, then you may not stud it all over with cloves. Instead, 1 hour before the ham is due to finish cooking, cover the ham with slices of pineapples and place a cherry each in the centre of the pineapple slices, secure everything in place with toothpicks. Return the ham to the oven to cook and glaze twice, during 15-minute intervals, half an hour before the ham is due to finish cooking.
Carving and serving
Let the ham rest for 20 to 30 minutes before carving. It needs the time for the juices to redistribute. Remove any toothpicks if you used the pineapple and cherry topping for your ham. Carve from the meatiest part of the ham making thin slices cutting down to the bone. After making several slices, run your knife parallel to the bone, cutting across and cutting free the slices. Repeat the cutting and slicing across until you have finished carving that section and then start carving another section.
The Drippings
Don’t throw away the drippings; you can do so many things with it – not all at once though. Store the drippings in an airtight container in the refrigerator. Add a little to your Cook-up rice, to your soups, stews and even sauté some vegetables with it. That is some serious ham flavour. Oh, you know what, you can add some to your rice as it is cooking for fried rice or toss your potatoes in the drippings and roast them. Ummmm, yummy smoky, meaty, ham flavours.
I hope that all your holiday cooking exploits are a success.
Have a Blessed and Happy Holiday everyone!
Cynthia
cynthia@tasteslikehome.org