 One of the ways that the Bible speaks of the “breaking of bread” is that of fellowship and the sharing of a communal meal. In that context, the act is replete with symbolism and meanings. I have a visceral reaction to the physical and literal breaking of bread (as a meal or food item); for me, it is one of the sincerest forms of expressing care, love, and appreciation. It is one of the reasons I cook – to share.
Today my focus is on the actual breaking of a loaf of bread, or bread roll. Rare is the occasion when caught in the fragrant rapture of bread baking or fresh out of the oven that one does not want to tear into it. We want to pull it apart, feel the warmth and tenderness in our hands and drown in the aroma as we bite into it. It is in these moments that you acknowledge that bread is life (lol).
I like to see people breaking the actual bread, therefore, on the occasions that I would entertain and serve bread at the start of the meal, the bread rolls are always larger than the average dinner roll because I want my guests to pry, pull, tear the rolls apart. I like it when people tear their bread and dunk it into soups, stews, or their favourite hot beverage. That’s good eating. One of my favourite things at Christmas time is to tear hunks of bread and let it soak up that spiced, rich dark sauce of Pepperpot. I don’t care for the meat. All I want is the bread and the sauce.
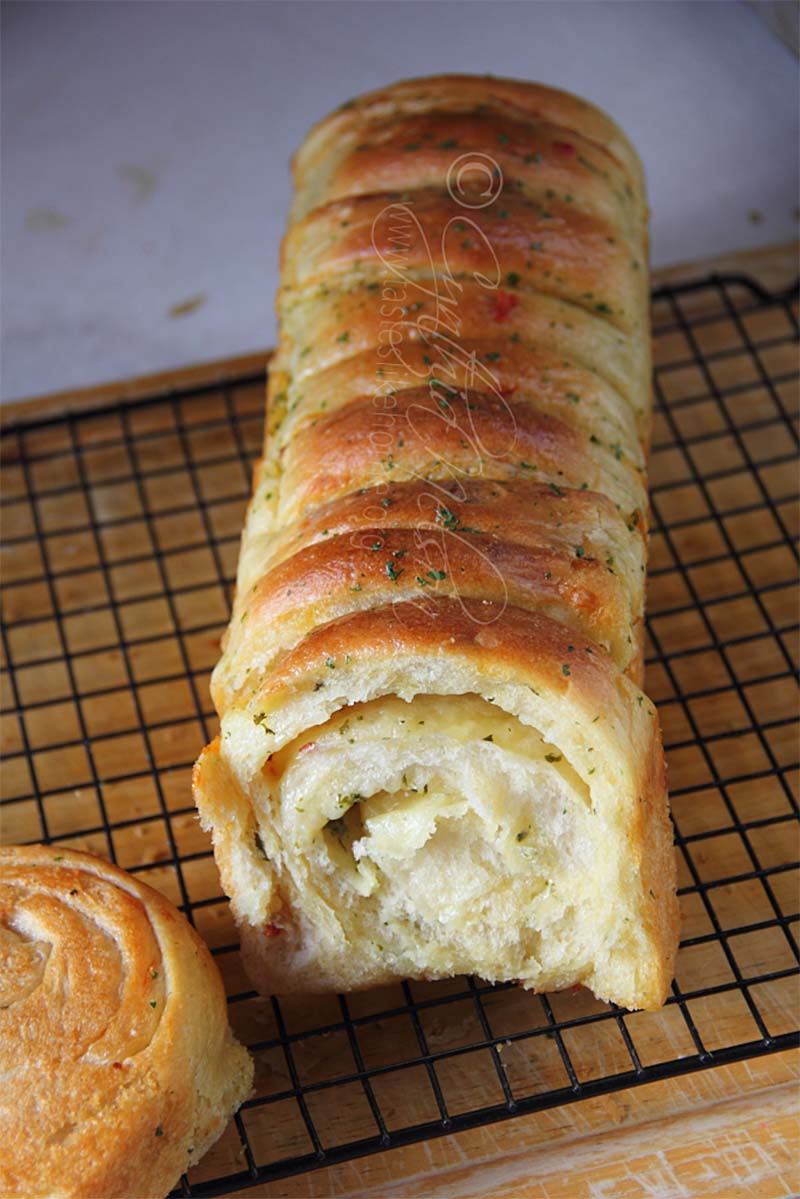
This pulling apart of bread brings me to a style of bread that is very popular, because in many ways, it seems a more “civilized” way to physically break bread and eat whether dining publicly or entertaining — pull-apart breads. One of the trendier ways is to get a store-bought crusty loaf, cut it criss cross into squares while keeping the base intact, stuff the spaces between the cuts with cheese, herbs, or some sort of pesto, heat the bread until the cheese melts and serve it hot. However, the type of pull-apart bread that I am drawn to is the homemade one where you can use a regular bread dough recipe or an enriched dough recipe and get creative with the fillings — sweet or savoury. You can have fun too with the putting together of the pieces of dough — you can stuff and roll them into balls, make squares and sandwich with fillings, make stuffed rolled logs, and cut them into pieces or make stuffed twists. Regardless of how you shape the dough, it is always pleasing, appetizing, and a treat when made to simply pull apart.
Over the past two weeks I have been de-cluttering around the house, from clothing to books and everything in between. I came across two recipe boxes that I have had for more than a decade. I opened the boxes and inside one of them, I found a recipe I had written down for Cheese and Herb Pull Apart Bread. It must have been a recipe I got from one of the many, many food magazines I have boxed to give away. The weekend was approaching, and I always like to bake something on the weekend to share with friends or neighbours, so I made the bread. I shared a pan with my neighbour and her handwritten thank you note the following morning said, ‘the bread was great!’ I ate some of mine the same day it was made with split pea soup flavoured with my Christmas-ham bone. The following day, I had it with tea and the day after that with Cream Soda and milk for an afternoon snack. The bread was lovely but what I really enjoyed was the act of pulling the bread apart to eat it.
If all you’ve been eating is sliced bread then I invite you to get a whole loaf of bread, baked yourself or bought, tear it, and eat it.
Cynthia
cynthia@tasteslikehome.org
Cheese & Herb Pull Apart Bread
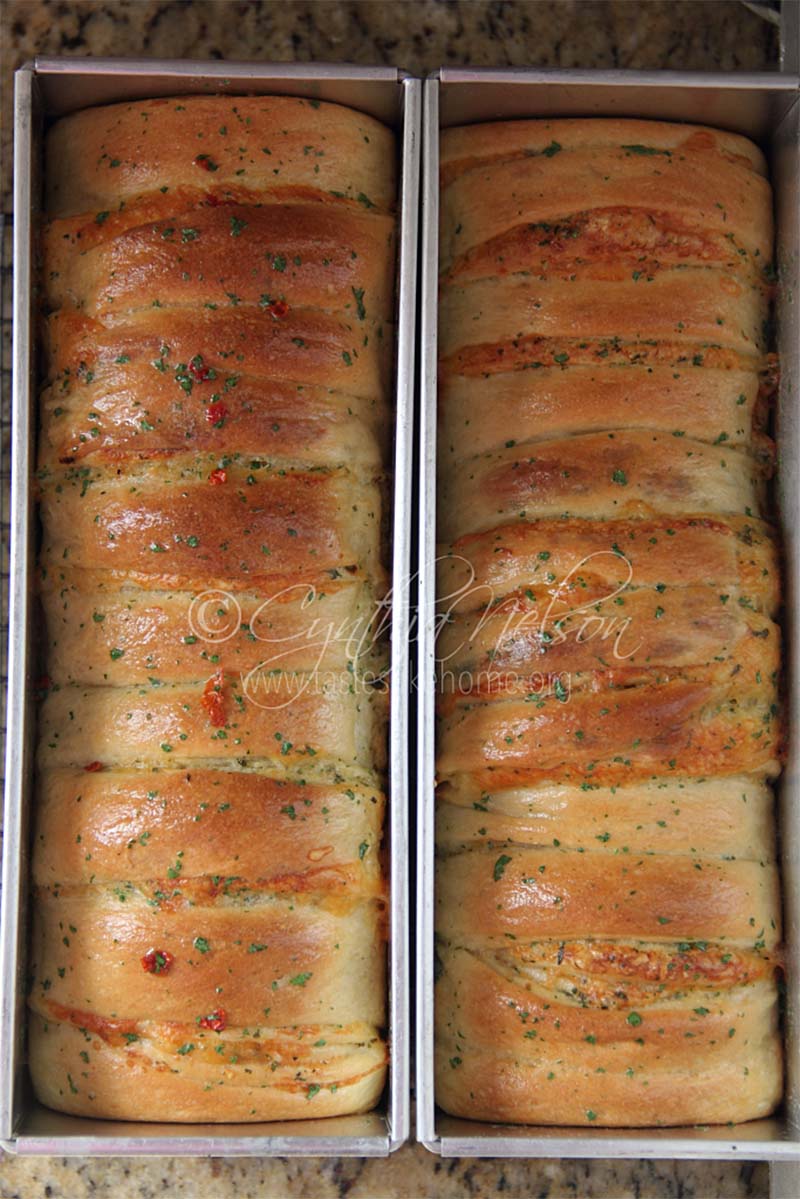
Yield: 2 loaves
INGREDIENTS
For bread:
• 4 cups all-purpose flour, plus extra for work surface
• 1 tablespoon instant yeast
• 2 tablespoons sugar
• 1¼ teaspoons fine table salt
• 2 tablespoons vegetable oil, plus extra for bowl
• Warm water (110 – 115 degrees F)
• 2 tablespoons melted butter, optional For filling:
• 3 – 4 tablespoons softened butter
• 3 tablespoons minced fresh herbs (parsley, thyme,)
• 4 heaped cups grated sharp cheddar cheese
DIRECTIONS
1. Add flour, yeast, sugar, and salt to a bowl and mix well.
2. Add oil and water to bring together to form a dough. Lightly flour a work surface and knead for 8 minutes, dusting lightly with flour as needed.
3. Transfer dough to an oiled bowl. Rub the top and sides of dough with oil, cover and place somewhere warm for 1 hour or until more than doubled in size.
4. Prep 2 (9 x 5) loaf tins or 2 (8-inch) round or square pans by brushing with oil and lining the bottoms with parchment paper (see notes section).
5. Punch down dough to remove gas and divide equally into 2. Return 1 piece of dough to bowl and cover while working on the other piece.
6. If using a 9 x 5 loaf pan, roll the dough to 9 inches wide and 14 – 16 inches long, spread half the butter on to the dough, sprinkle with half the herbs and then half of the cheese. Starting with the smaller end (9 inches), gently roll the dough and filling on to itself forming a log. Using a sharp knife and cutting guillotine-style (straight down) cut the log into 1-inch pieces and carefully transfer to one of the prepped pans. Repeat with the other piece of dough. If using a round pan, arrange the log into a ring in the pans.
7. Cover and let rise for 30 minutes. 20 minutes before the time is up, preheat the oven to 400 degrees F.
8. Transfer the pans to the oven bake for 25 minutes or until the bread is nicely browned and the top is firm when tapped.
9. Remove from the oven, and, if using, immediately brush with melted butter. Let rest in pans for 10 minutes then remove and cool on wire racks for at least 45 minutes before using.
NOTES
• Use a combination of herbs of your choice. Roasted garlic can be mashed into the softened butter to add another flavour to the bread.
• Lightly brush the parchment paper with oil for added assistance when peeling from the loaf. If using quality non-stick pans, there should be no need to use parchment paper. However, if using aluminium pans (like I did), the parchment paper lined at the bottom helps.