 Cheese on Bread is a well-known Bajan saying that is an exclamation of amazement. It is uttered with great enthusiasm. Sometimes it is followed by referencing the thing that prompted the outburst. It is the expression that aptly suits the Cheese Bread I made earlier this week. Cheese on bread, that Cheese Bread was on point!
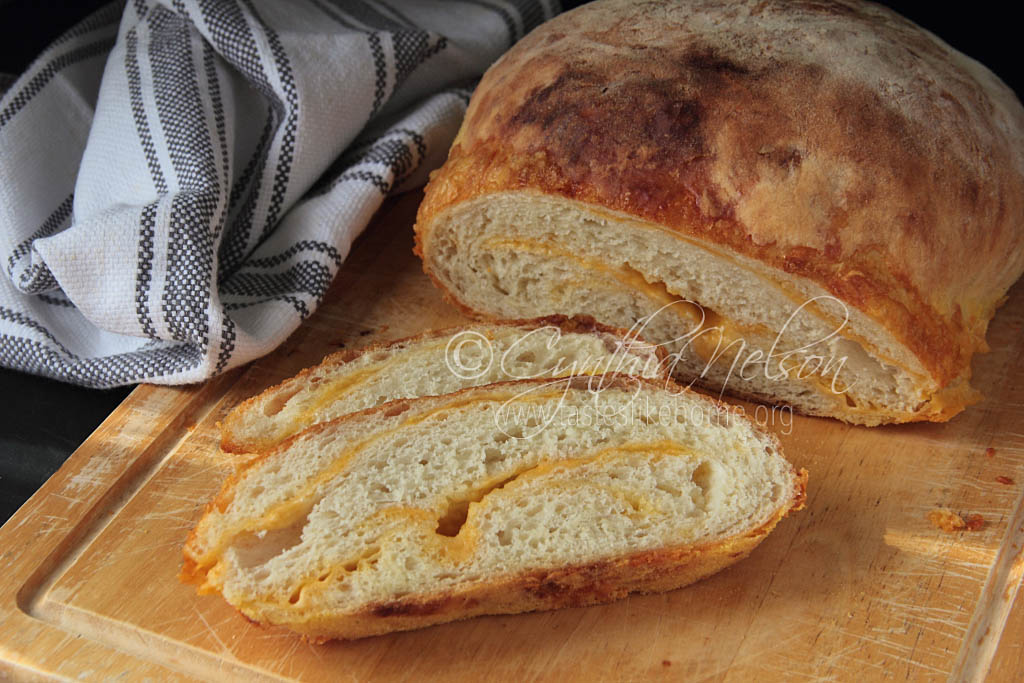
One of my favourite quick breads to make is a cheese and herb quick bread, lovely and delicious in its own right, but the bread I made recently is a different type of Cheese Bread. It was a yeasted bread with grated cheese folded into layers of the dough. The aroma of bread in the oven is always captivating. Now imagine that aroma with cheese melting. Cheese on bread!
The hardest part about making this bread is having to wait to cut into it. And when you’ve planned your main meal for the day around this bread, it’s like self-inflicted punishment. The savoury aroma of the bread intensifies when the bread is out of the oven. You watch the clock on the wall, willing time to move faster. Your eyes move repeatedly from the clock to bread and from the bread to the clock. Each time you notice that it’s not even a minute since you last looked at the clock. Alas, you walk out of the kitchen and try to busy yourself with some inane activity. The tantalising smell of fresh bread and cheese hangs in the air, following you.
Any type of bread you make needs time to cool. Cutting it too soon can ruin the texture and cause the bread to dry out; always remember that. Wait at least 45 minutes before cutting into bread. You will find it welcomingly warm so that when smeared with butter, the butter will melt a little making it one of life’s little pleasures.
As I waited for my Cheese Bread to cool, I began to think of how perfectly the two things go together – cheese and bread. Even when that bread is a bread roll. Tennis roll and cheese anyone? A cheese sandwich is one of the easiest things to make, it always tastes good, it’s filling, and satisfying. And you can make it more than one way. A cheese sandwich can simply be 2 pieces of bread with slices of cheese, or slices of cheese topped with thin slices of onions and eaten as is. Or it could be the bread with cheese pressed together, buttered on the outsides and toasted slowly until the cheese melts. Grilled cheese sandwich or a toastie it’s called depending on where you are from. Don’t forget that you can also make a cheese spread and butter it generously onto the bread.
I was so lost in my thoughts that it was 55 minutes since the Cheese Bread had been out of the oven. Yes! Time to slice and eat! I think I overstuffed my bread a little with cheese because I saw some had oozed merging as a crust with the dough. No worries, even better. I sliced the bread, excited to see what it looked like on the inside. The bread was soft and I could see the layers of melted cheese like a swirl. I hurriedly took the photographs and set about having the bread with some leftover pumpkin and beef soup that I had reheated. The bread on its own was sublime. I tore off chunks from the slices and dipped them into the soup as if dunking and ate the bread. Oh man, the bread was even better with all the wonderful flavour of the soup. There is a reason that soup and bread go so well together. The following day, I simply sliced and toasted bread, smeared it with butter and had it with tea. It really is good on its own. I still have some left back in the refrigerator. I think I’ll make ham sandwiches.
I used my go-to No Knead bread recipe to make this cheese bread. However, you can make the bread using your regular loaf bread recipe.
Try it and let me know what you think.
Cynthia
No Knead Cheese Bread
INGREDIENTS
3¼ cups all-purpose flour, plus extra for the work surface
2¼ teaspoons instant dry yeast
1½ teaspoons fine table salt
2 teaspoons brown sugar
1½ cups warm water (110 – 115 degrees F)
3 packed cups grated sharp cheddar cheese
2 tablespoons cornmeal (optional)
DIRECTIONS
1. Add the flour, yeast, salt and sugar to a large bowl and stir well to mix then pour in the water and mix until sticky dough comes together and there is no dry flour in the bowl. Cover and put in some place warm for 2 hours.
2. Meanwhile grab a sheet pan, line it with parchment paper and dust with cornmeal if using, if not, dust it with flour and set aside.
3. At the end of the proofing time for the dough, generously flour a work surface and tip the dough out of the bowl onto the floured surface. Lightly wet your hands and spread the dough out about 10 – 12 inches. Generously sprinkle with cheese to cover the entire surface.
4. Now you are going to fold the dough onto itself like an envelope – fold 1 part halfway up the surface and then bring the other half over. Sprinkle with the remaining cheese to cover the length of the folded dough, then fold one end over then the other. Pinch the dough at the last fold to seal then turn the stuffed dough seam-side down and use your hands to tuck the dough in tightly at the bottom before transferring it to the lined baking sheet. Let the dough rest and rise for 40 minutes.
5. 20 minutes before the total resting time, preheat the oven to 425 degrees F.
6. Transfer the bread to the oven and bake for 30 – 35 minutes or until the bread is brown and sounds hollow when the bottom is tapped.
7. Remove the pan from the oven and let rest 10 minutes before transferring bread to a wire rack to cool for at least 45 minutes before cutting.
NOTES
I baked my bread in a cast iron skillet and you can if you have one. Here’s how and what to do:
⦿ tear off a large piece of parchment paper and dust it with
cornmeal or flour and set aside.
⦿ add the cast iron skillet to the oven to heat up
while the oven is preheating (see direction # 5)
⦿ carefully remove the hot pan from the oven and
lift the parchment paper with the risen dough and
place it gently into the pan. Working carefully,
fold down the parchment paper to about 2 – 3
inches shy of the rim of the pan. Or use scissors
to cut off the excess
⦿ carefully transfer the pan with bread to the oven
and cook for 25 – 30 minutes or until the bread is
brown and sounds hollow when tapped. Conti-
nue with direction # 7.